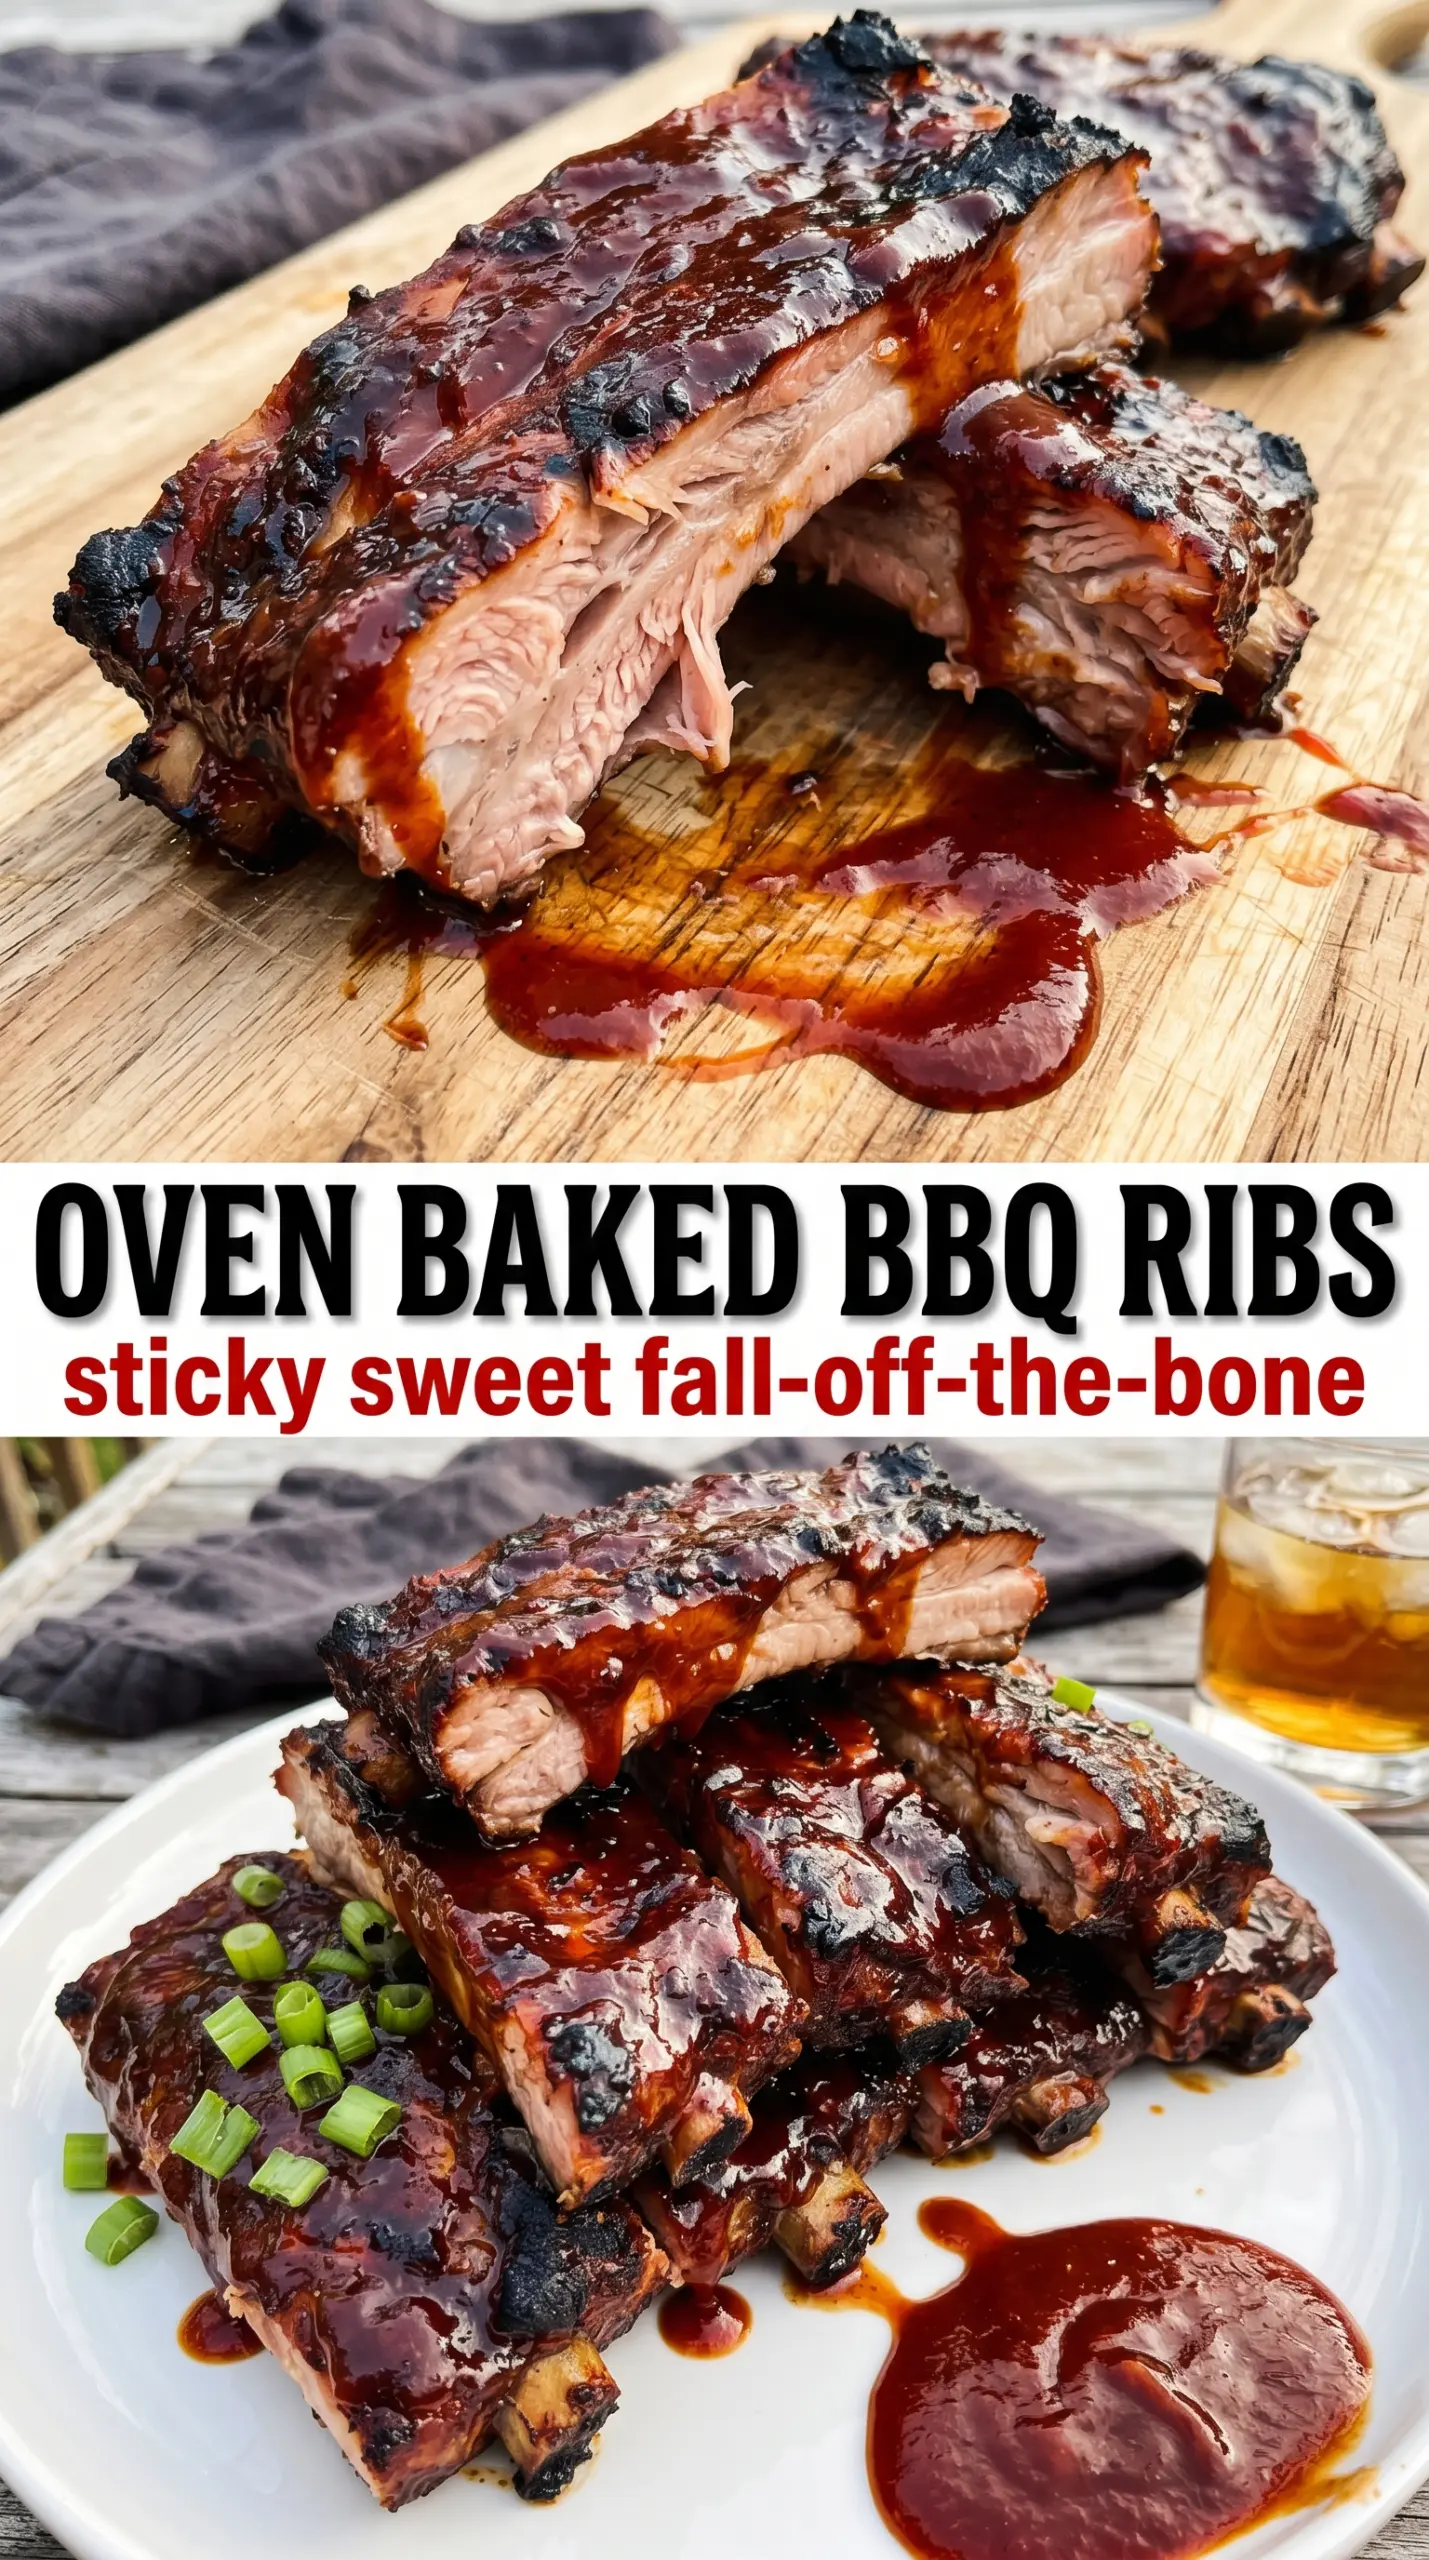
Sticky, tender oven baked BBQ ribs earn their place on repeat because they come out with that same deep, smoky-sweet finish you expect from a grill, only without babysitting a fire. The meat turns buttery-soft under the rub, then the sauce sets into a glossy glaze that clings to every ridge and bone.
The key is low heat first, high heat last. A 275°F oven gives the ribs time to relax and become tender without drying out, and the foil wrap traps enough moisture to keep the meat supple. The broiler at the end isn’t there for show; it’s what turns plain barbecue sauce into a sticky lacquer with browned edges and real texture.
Below, I’ve included the part that matters most if you want ribs that pull apart cleanly instead of turning stringy: how to handle the membrane, when to unwrap, and exactly what you should look for before the sauce goes on.
The ribs were fall-apart tender after 3 hours, and the broil step gave the sauce that sticky edge my family fights over.
Oven baked BBQ ribs with that sticky broiled glaze are the kind you’ll want to save for weekend dinners and special occasions alike.
The Membrane Is What Keeps Good Ribs From Turning Tender
Most ribs that eat tough, even after a long bake, fail before they ever hit the oven. The silver membrane on the back of the rack tightens as it cooks, and if you leave it on, it blocks seasoning from reaching the meat side and gives the finished ribs a chewy layer that never quite breaks down.
Peel it off before you add the rub. Slide a knife under one end, lift until you can grab it with a paper towel, then pull it away in one sheet if possible. If it tears, start again at another edge; a little extra effort here pays off in ribs that bend cleanly and separate at the bone.
- Baby back pork ribs — These are leaner and smaller than spare ribs, which is why they work well in the oven at a lower temperature. St. Louis-style ribs can be used, but they’ll need a little more time because they’re meatier.
- Brown sugar — This helps the rub caramelize under the broiler and gives the meat a darker finish. Light or dark brown sugar both work.
- Smoked paprika, cumin, cayenne — This is the backbone of the rub. Smoked paprika brings the campfire note you’d normally chase with smoke, cumin adds warmth, and cayenne keeps the sweetness from tasting flat.
- BBQ sauce — Use a sauce you actually like eating on its own, because broiling intensifies whatever is in it. If yours is very thick, loosen it with a spoonful of water so it brushes on in a thin, even layer instead of clumping.
What Each Ingredient Is Actually Doing in This Pork Dish
- Pork (cut properly for the method) — Pat dry so it browns instead of steams. Even thickness ensures uniform cooking.
- Oil or butter (the browning medium) — High-heat oil essential for proper searing. Creates pan flavor.
- Seasonings (salt, pepper, spices) — Build flavor boldly. Pork carries the entire profile.
- Aromatics (garlic, onion, herbs) — Cook with fat to bloom flavors. Become the foundation.
- Sauce or liquid (broth, cream, or glaze) — This keeps lean pork from drying. Balance richness with acid.
- Vegetables (if using) — Layer by cooking time so everything finishes together.
- Acid (vinegar, wine, or citrus) — This brightens sauce and prevents heavy flavor.
- Proper doneness (145°F with slight pink center) — Pork is safe here and stays juicy. Higher temps dry it out.
Getting the Oven to Do the Work, Then Letting the Broiler Finish the Job
Season Every Surface Before the Wrap
Mix the dry rub until the sugar and spices are evenly distributed, then coat the ribs on both sides. Press the seasoning into the meat instead of just dusting it over the top; that helps the surface form a better crust later. Heavy-handed seasoning is a good thing here because the foil wrap and long bake soften the edges of flavor.
Seal the Ribs in Foil So They Braise Gently
Wrap each rack tightly in heavy-duty foil and set them on a baking sheet so any juices stay contained. The foil traps steam and renders the fat slowly, which is what gives you that pull-apart texture without drying the ribs out. If the foil isn’t sealed well, the ribs can go dry before they become tender.
Cook Until the Meat Pulls Back From the Bones
Bake at 275°F for 2 1/2 to 3 hours, then check for tenderness by lifting the foil and nudging a bone. The meat should shrink back from the ends of the bones, and a knife should slide in without resistance. If the racks still feel tight, give them another 20 to 30 minutes; undercooked ribs are firm and stubborn, not soft and bendy.
Glaze and Broil for a Sticky Finish
Unwrap the ribs carefully because the steam is hot, then brush on a generous layer of BBQ sauce. Broil for 5 to 7 minutes, watching closely the entire time, until the glaze bubbles and darkens at the edges. The line between caramelized and burned is thin under the broiler, so keep the rack a few inches below the element and pull it once the sauce looks glossy and set.
Make Them a Little Spicier
Add another 1/4 teaspoon cayenne to the rub or stir a little hot sauce into the BBQ sauce before broiling. That extra heat cuts through the sweetness and gives the glaze a sharper finish without changing the texture of the ribs.
Use Spare Ribs Instead of Baby Back
Spare ribs work well here, but they’re larger and usually need closer to 3 1/2 hours in the oven. Expect a meatier bite and a little more fat, which can be a bonus if you want ribs that taste richer and hold up well to a heavy glaze.
Make It Gluten-Free
The ribs themselves are naturally gluten-free, but the BBQ sauce has to be checked carefully because some brands use wheat-based thickeners or soy sauce. Choose a certified gluten-free sauce and the method stays exactly the same.
Storage and Reheating
- Refrigerator: Store leftovers in an airtight container for up to 4 days. The sauce will thicken as it chills, but the meat stays tender if it was cooked through properly.
- Freezer: These freeze well. Wrap portions tightly and freeze for up to 2 months; thaw overnight in the refrigerator before reheating.
- Reheating: Cover with foil and warm in a 300°F oven until heated through, then brush with a little extra sauce if needed. The common mistake is blasting them uncovered in the microwave, which dries the edges out before the center warms.
Answers to the Questions Worth Asking

Oven Baked BBQ Ribs
Ingredients
Equipment
Method
- Preheat oven to 275°F so it’s ready for low-and-slow baking. Keep the oven fully preheated before the ribs go in.
- Remove the silver membrane from the back of each rack. Pull it off cleanly so the rub can penetrate and the meat becomes tender.
- Mix all dry rub ingredients and coat ribs thoroughly on all sides. Press the rub into the surface until every area looks evenly dusted.
- Wrap each rack tightly in heavy-duty foil and place on a baking sheet. Seal the foil well to trap moisture during the long bake.
- Bake 2.5–3 hours until meat is tender and pulls away from the bone. The ribs should look soft when you gently lift them with tongs through the foil.
- Unwrap the ribs and let them rest for 30 min to allow the surface to dry slightly. You should see the surface moisture reduce before saucing.
- Brush generously with BBQ sauce on the unwrapped ribs. Coat the whole rack so the glaze will turn shiny and sticky.
- Broil 5–7 minutes until glaze is caramelized, watching closely to avoid burning. Serve with extra BBQ sauce for dipping.