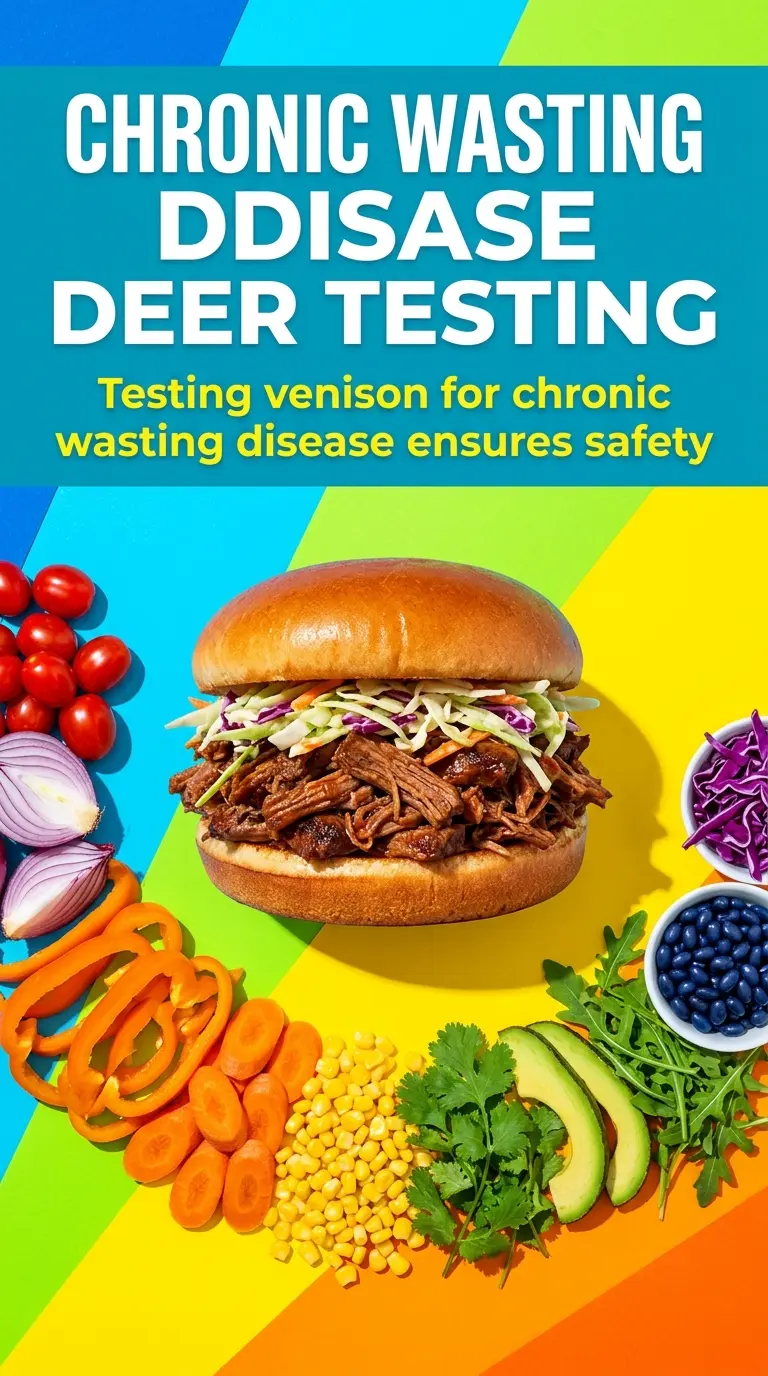
Shredded BBQ venison brings the kind of sandwich filling that holds onto sauce without turning mushy, and that makes every bite worth coming back for. The meat stays lean, so the win here is in coaxing it into tenderness first, then folding it into a sauce that clings instead of puddles. On a toasted bun with crisp coleslaw, it eats like a proper sandwich should: messy in the best way, with enough structure to keep your hands clean for at least a few bites.
The trick is giving the roast a quick sear before it goes into the slow cooker. That browned crust adds depth you can taste all the way through the finished meat, and the slow, gentle cook gives the venison time to relax and shred cleanly. The BBQ sauce goes in twice here, which matters: some cooks get tempted to pour it all in at the start, but reserving part of it for the finish keeps the final texture rich and glossy instead of thin and tired.
Below, I’ve included the one step that keeps venison from tasting flat, plus the best way to adjust this sandwich if your roast is extra lean or you want a little more heat in the sauce.
The venison shredded beautifully after the long slow cook, and mixing in that extra BBQ sauce at the end kept it juicy instead of dry. My husband said it tasted like the best pulled pork sandwich he’d ever had, just with a deeper, richer flavor.
Juicy shredded BBQ venison on toasted buns is the kind of sandwich worth pinning for game days and easy dinner nights.
The Sear That Keeps Venison From Tasting Flat
Venison needs a little help before it goes into the slow cooker. That quick sear is not there for looks; it builds the savory base that keeps the finished meat from tasting one-note. Skip it and you’ll still get tender shreds, but they’ll taste softer in a bad way, like something missing from the middle.
The other thing that matters is keeping the cooking liquid restrained. Venison doesn’t need to swim in sauce to get tender, and too much liquid can wash out the smoky edge you worked for with the sear and paprika. The roast should cook low and slow until it pulls apart with little resistance, but it should still taste like venison, not like generic shredded meat.
- Searing the roast — A hot grill or skillet gives you browned edges that deepen the sauce later. Two minutes per side is enough here; you’re not cooking it through, just building flavor.
- Onion and garlic — They melt into the sauce as the roast cooks and give the filling a sweeter, rounder finish. Fresh garlic matters more than jarred here because it needs to soften, not just survive.
- Worcestershire sauce — This is the quiet backbone of the whole sandwich. It adds salt, tang, and a little fermented depth that BBQ sauce alone usually can’t cover.
- Brown sugar — Just enough to balance the smoke and vinegar in the sauce. It doesn’t make the sandwich sweet; it keeps the BBQ flavor full instead of sharp.
What Each Ingredient Is Doing Inside the Pot
The venison roast is the main event, and it needs enough time to unwind. A lean cut works fine, but the long cook is non-negotiable because that’s what turns a firm roast into strands that pull apart cleanly. If your roast looks a little dry going in, don’t panic; the sauce and onion will give it the moisture it needs as it cooks.
The BBQ sauce does two jobs here: it seasons the meat while it cooks, then it finishes the shredded filling with gloss and body. Use a sauce you’d actually eat on its own, since the flavor gets concentrated once it clings to the meat. The coleslaw is just as important, because the crunch cuts through the richness and keeps the sandwich from eating heavy.
If you don’t have a grill for the sear, a cast-iron skillet works just fine. A good store-bought BBQ sauce is a smart shortcut here, but if it’s very sweet, cut back the brown sugar a little so the sandwich stays balanced.
The Slow Cooker Timing That Gives You Real Pull-Apart Texture
Season and Brown the Roast
Pat the venison dry, then season it well with salt, pepper, and smoked paprika. Sear it over high heat until you get a deep brown crust on both sides; that color is flavor, and it matters more than getting a perfect sear all the way around. If the pan or grill is crowded, the meat will steam instead of brown, so give it room. The roast should look dark at the edges before it goes into the slow cooker.
Build the Braising Base
Lay the sliced onion and minced garlic in the slow cooker, then add the Worcestershire sauce, brown sugar, and only part of the BBQ sauce. That split keeps the sauce from thinning out too early and lets the meat absorb the savory base first. Set the seared roast on top so it sits in the onion mixture rather than sinking into a bath of sauce. The goal is moist, not soupy.
Cook Until the Meat Gives Up Easily
Cook on low until the roast shreds with almost no resistance, usually 6 to 8 hours depending on the size and shape of the cut. If it still fights you when you pull it apart, it needs more time; venison gets tender in stages, and rushing this part leaves you with stubborn chunks instead of soft strands. When it’s ready, the meat should fall apart when you press it with a fork.
Finish With the Remaining Sauce
Shred the venison right in the cooker, then stir in the remaining BBQ sauce until every strand looks coated and glossy. This is where the sandwich gets its proper texture: not dry shreds, not drowning in sauce, just meat that holds together when piled on a bun. Toast the buns so they can handle the filling, then add the coleslaw on top or alongside depending on how messy you want the sandwich to be.
How to Adapt This Sandwich for Different Eaters and Different Roasts
Use a leaner venison cut without drying it out
If your roast is especially lean, add a splash of beef broth to the slow cooker, just enough to keep the bottom from drying out. Don’t add a lot, or the sauce gets washed out and the sandwich loses its deep, sticky finish.
Make it gluten-free without changing the texture
Use a gluten-free Worcestershire sauce and serve it on gluten-free buns. The filling itself stays the same, and the final texture doesn’t suffer as long as the BBQ sauce you choose is also gluten-free.
Add heat without burying the BBQ flavor
Stir a little chipotle powder or hot sauce into the final sauce rather than the cooking liquid. Adding heat at the end keeps it brighter and lets you control the kick without making the whole pot taste sharp.
Turn the filling into a plated dinner
Skip the buns and spoon the pulled venison over baked potatoes, rice, or buttered cornbread. You’ll get the same rich filling with a little less mess, and the coleslaw still works on the side for crunch.
Storage and Reheating
- Refrigerator: Store the pulled venison in an airtight container for up to 4 days. The flavor gets even better overnight, but the buns should be toasted fresh when serving.
- Freezer: It freezes well for up to 3 months. Freeze the meat with extra sauce so it reheats moist instead of stringy, and thaw it overnight in the refrigerator.
- Reheating: Reheat gently on the stovetop or in the microwave with a spoonful of extra sauce. High heat is the mistake that dries venison out fast, especially after it’s already been shredded.
Answers to the Questions Worth Asking

BBQ Venison Sandwich
Ingredients
Equipment
Method
- Season venison roast with salt, pepper, and smoked paprika, coating all sides evenly. This creates a smoky crust once it hits high heat.
- Sear venison on a grill over high heat for 2 minutes per side. Look for deep browning around the edges before moving to the slow cooker.
- Place venison in the slow cooker with sliced onion, minced garlic, Worcestershire sauce, brown sugar, and 1 cup BBQ sauce. Stir the sauce components to help coat the roast.
- Cook on low for 6-8 hours until very tender. When pressed with a fork, the meat should pull apart easily.
- Shred the venison and mix it with the remaining BBQ sauce. Mix until the pulled meat looks evenly glazed.
- Serve pulled venison on toasted hamburger buns with coleslaw. Assemble so the sauce stays on the meat while the slaw adds crunch.