These bacon jalapeño popper bites disappear fast because they hit every note people want in a party appetizer: crisp bacon, creamy filling, just enough heat, and that little sweet finish if you drizzle on honey. The jalapeños soften in the oven without turning limp, so you get a bite that still has a clean snap under all that melted cheese. They’re the kind of snack people hover near the pan for.
What makes this version work is the balance. Thin-cut bacon wraps and crisps before the filling has a chance to dry out, and the cream cheese-cheddar mixture stays thick enough to hold its shape instead of leaking all over the pan. A wire rack helps the bacon render on all sides, which matters more than people think when you want a bite that feels snacky instead of greasy.
Below, I’ve included the details that keep the filling from sliding out, plus the one swap I use when I want these a little milder without losing the pepper pop.
The bacon got crisp in the oven and the filling stayed put instead of melting out everywhere. I drizzled a little honey at the end and my husband kept grabbing them straight off the tray.
Love the crispy bacon edges and creamy jalapeño filling? Save these bacon jalapeño popper bites to Pinterest for your next game day spread.
The Secret to Bacon That Crisps Before the Cheese Leaks
The biggest mistake with bacon-wrapped poppers is letting the filling get too warm before they go into the oven. Soft cream cheese is good; loose, glossy filling is not. Keep the mixture thick, stuff the peppers generously, and wrap the bacon snugly so it presses the filling into the jalapeño instead of letting it spill out.
Thin-cut bacon matters here. Thick slices need longer to crisp, and by the time they’re done the peppers can overcook and the cheese can split. The wire rack does more than make cleanup easier — it keeps the bottoms from steaming in bacon fat, which is the difference between a crisp bite and a soggy one.
What Each Ingredient Is Actually Doing in These Popper Bites
- Jalapeños — These bring the heat and the structure. Larger peppers are easier to halve and fill, and seeding them well gives you control over the spice level without losing that jalapeño flavor.
- Cream cheese — This is the base that keeps the filling smooth and rich. It needs to be softened first so it mixes evenly; cold cream cheese leaves little lumps that won’t melt out nicely.
- Sharp cheddar — Cheddar adds salt, tang, and a little stretch once the bites are hot. Pre-shredded works in a pinch, but freshly shredded melts more cleanly and gives a better texture.
- Thin-cut bacon — Thin bacon wraps tightly and crisps in the same window that the peppers soften. If you use thick-cut bacon, the filling can overcook before the bacon is ready.
- Honey — Optional, but worth trying. A light drizzle at the end gives the bacon and jalapeño a sweet-salty finish that makes the spicy filling stand out even more.
How to Build the Filling and Bake Without a Mess
Mixing the Cheese Base
Stir the softened cream cheese, cheddar, garlic powder, and smoked paprika until the mixture looks uniform and holds together when scooped. You want it thick and spreadable, not loose and glossy. If the cream cheese is still cold, stop and let it warm up a bit more; stubborn little lumps never melt out as well once the bites are in the oven.
Filling the Jalapeños
Spoon or pipe the filling into each jalapeño half and mound it slightly above the edges. That extra bit helps the pepper feel full after the bacon tightens around it. Don’t overfill to the point where it spills over onto the cut sides, or the bacon won’t grip the pepper as well and you’ll lose some of the filling in the pan.
Wrapping for the Best Crisp
Wrap each half-strip of bacon around the filled pepper as snugly as you can and secure it with a toothpick. The bacon should overlap a little, but not so much that it turns into a thick band that refuses to crisp. Arrange them on a wire rack so the fat can drip away; that’s how you get browned bacon on top and bottom instead of pale, rubbery strips.
Knowing When They’re Done
Bake until the bacon looks crisp at the edges and the filling is bubbling in the centers, usually 18 to 22 minutes. If the bacon is still floppy, keep them in a few minutes longer and watch closely near the end. Pull them once the bacon looks set, because the carryover heat finishes the peppers without drying out the cheese.
How to Make These Popper Bites Your Own Without Losing the Crunch
Make Them Milder for a Mixed Crowd
Use larger jalapeños, remove every seed and white rib, and soak the halved peppers in cold water for 10 minutes before filling if you want the heat pulled back even more. You’ll still get the jalapeño flavor, but the bite lands softer and more kid-friendly.
Swap in Turkey Bacon
Turkey bacon will work, but it won’t render the same way, so expect a leaner, less crackly finish. Brush it lightly with oil before baking so it browns instead of drying out, and watch it closely because it can go from pale to overdone fast.
Make Them Gluten-Free and Still Party-Ready
This recipe is naturally gluten-free as written, which is one less thing to worry about on a snack table. Just check that your bacon and any pre-shredded cheese are labeled gluten-free if you’re cooking for someone with a strict sensitivity.
Storage and Reheating
- Refrigerator: Store leftovers in an airtight container for up to 4 days. The bacon softens as it sits, but the filling still tastes great.
- Freezer: Freeze after baking only if you need to. They’ll lose some crispness, but they do freeze well in a single layer and can be reheated from frozen.
- Reheating: Warm them on a wire rack in a 375°F oven or air fryer until the bacon tightens back up. The microwave will melt the filling faster than it warms the bacon, which is how you end up with a limp wrapper and greasy bottom.
Questions I Get Asked About This Recipe

Bacon Jalapeño Popper Bites
Ingredients
Equipment
Method
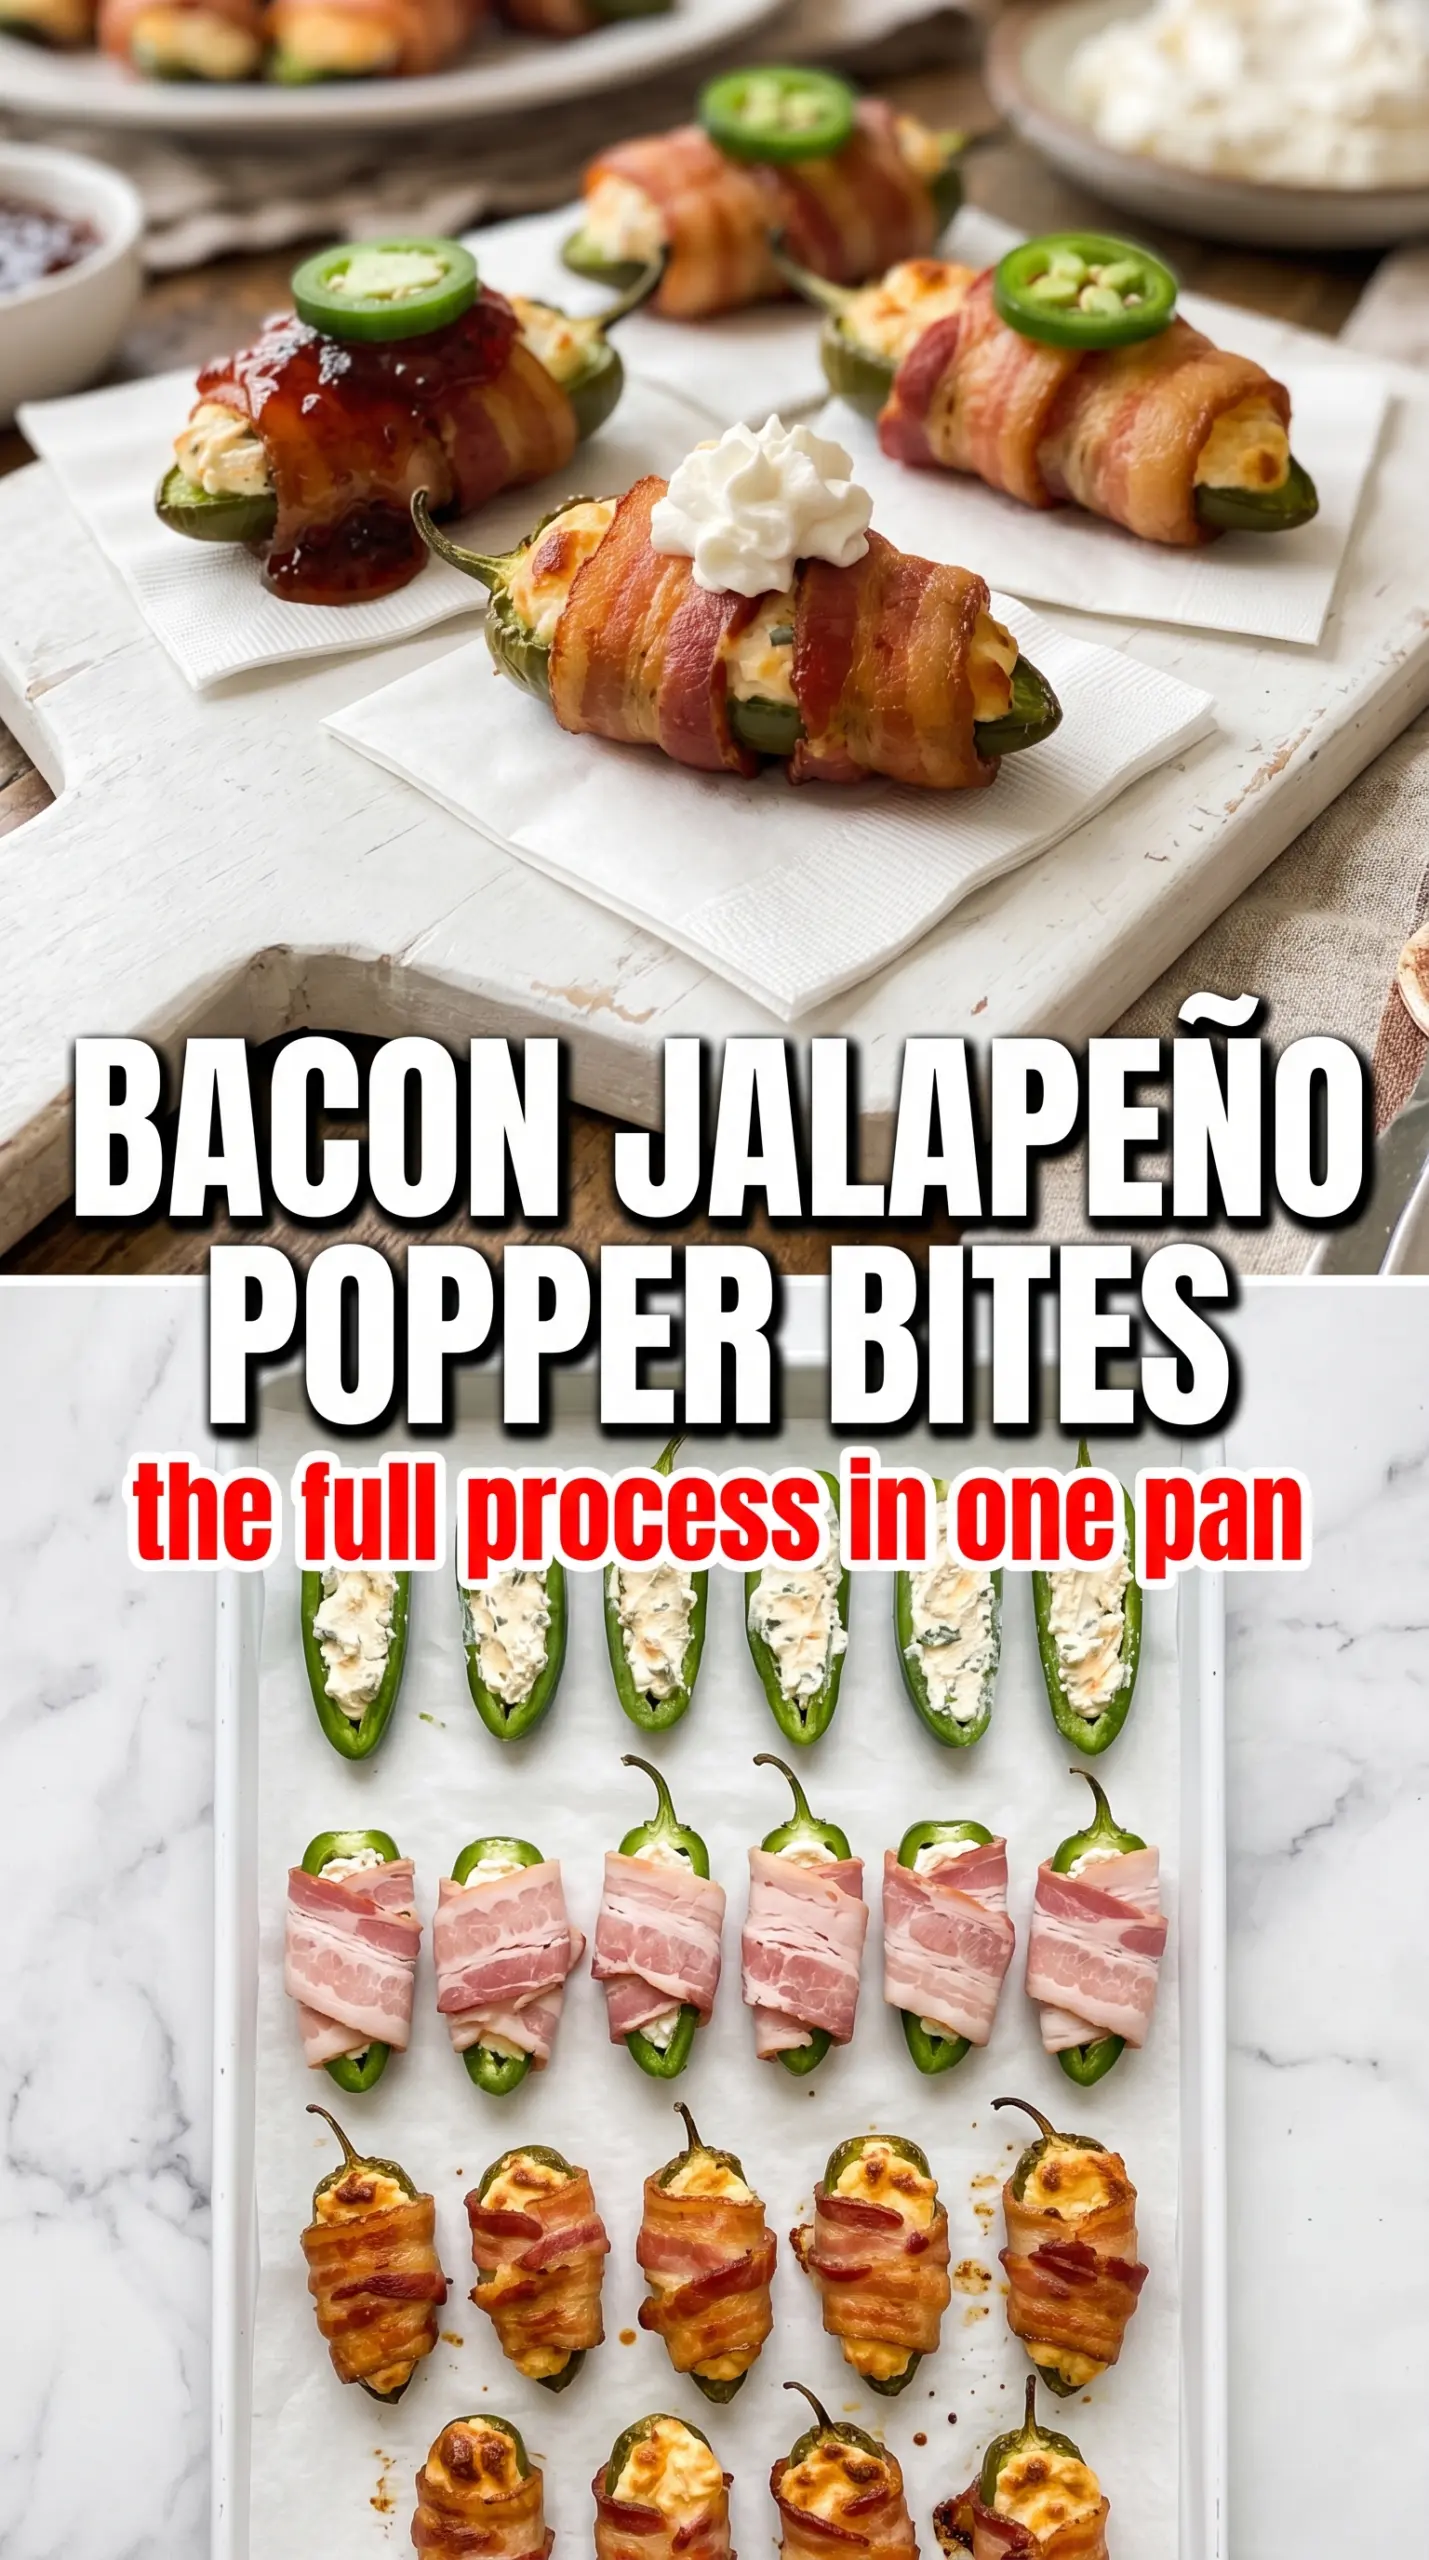
- Preheat oven to 400°F and line a baking sheet with a wire rack so the bacon crisps instead of steams.
- Halve the jalapeños lengthwise and seed them to control the heat level before filling.
- Mix cream cheese, shredded cheddar, garlic powder, and smoked paprika until fully combined for a thick, spoonable filling.
- Fill each jalapeño half generously with the cream cheese mixture using a spoon or piping bag to pack it in.
- Wrap each filled jalapeño half tightly with a half-strip of bacon and secure with a toothpick so it holds during baking.
- Arrange on the wire rack with space between pieces for even browning.
- Bake at 400°F for 18–22 minutes until the bacon is crispy and the filling is bubbling, with a light char visible at the edges.
- Drizzle with honey if desired and serve hot so the melted filling stays gooey.