Restaurant-style black beans should taste deep, savory, and glossy, with enough body to cling to a spoon instead of sitting watery at the bottom of the bowl. The best versions have that slow-simmered flavor you notice right away: a little garlic, a little cumin, and a creamy texture that comes from a handful of beans breaking down naturally in the pot. When they’re done right, they don’t feel like a side dish you rushed through. They taste like the part of the meal people keep reaching for.
This version leans on a few small moves that matter. The onion and garlic are cooked in olive oil first, which gives the beans a rounder base before any liquid goes in. Then the beans simmer uncovered so the broth reduces and concentrates instead of staying thin. The final mash is what gives you that restaurant look and texture without needing cream, butter, or a blender. A squeeze of lime at the end wakes everything up, and the cilantro goes in last so it stays bright.
Below, I’ve added the couple of details that make the difference between plain black beans and the kind you’d happily serve with tacos, rice, grilled chicken, or just warm tortillas.
The beans turned out thick and creamy without getting mushy, and the lime at the end made them taste like the ones we always order at our favorite Mexican restaurant.
Keep these restaurant-style black beans handy for tacos, burrito bowls, and rice nights when you want something creamy, savory, and fast.
The Part That Makes These Beans Taste Like They Came From a Good Taqueria
The biggest mistake with black beans is stopping too soon. If you heat them just until they’re hot, they stay thin and taste like canned beans with seasoning on top. The flavor needs time to come together, and the broth needs time to reduce enough that it coats the beans instead of pooling around them.
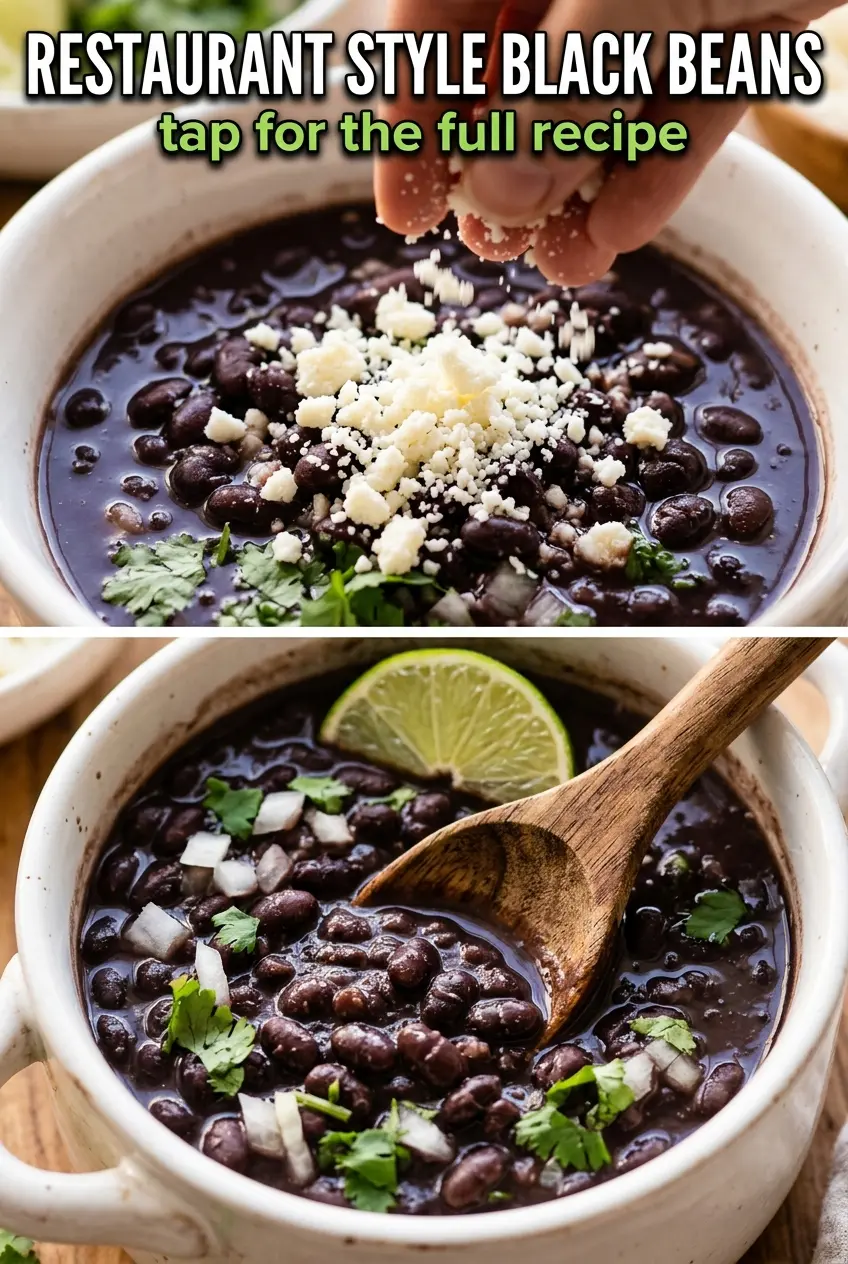
Using the onion in quarters is a small trick that pays off. It flavors the pot without disappearing completely, and because it stays in larger pieces, you can pull it out if you want a smoother finished look. The partial mash matters too. Mash too little and the beans look loose. Mash too much and you lose the contrast that makes the texture interesting.
- Olive oil — This carries the garlic and cumin into the beans and gives the finished pot a richer sheen. A neutral oil works in a pinch, but olive oil adds a little more depth.
- Black beans — Canned beans are the right choice here because they already have the creamy interior you want. Drain and rinse them so the final broth tastes seasoned, not starchy or metallic.
- Broth — Vegetable broth keeps the beans vegetarian, while chicken broth gives them a slightly fuller, rounder flavor. Water will work, but the beans won’t taste as complete.
- Lime juice — This is not garnish. It brightens the beans at the end and keeps the savory flavor from tasting flat. Add it after the simmer so it stays clean and fresh.
What Each Ingredient Is Actually Doing in the Pot
- White onion — Quartered onion softens into the background and perfumes the oil before the beans go in. If you want a cleaner finish, remove it before serving; if you like a more rustic side, leave the softened pieces in.
- Garlic — Minced garlic cooks fast and burns even faster, so it only needs a minute in the oil. Once it smells sweet and sharp, move on. If it turns brown, the bitterness stays in the beans.
- Bay leaves and cumin — Bay leaves add a slow, herbal backbone, while cumin gives the beans that familiar warm, earthy restaurant flavor. Don’t swap in a heavy hand of extra cumin to try to replace the bay; they do different jobs.
- Cilantro — Stir it in at the end so it stays fresh and green. If cilantro tastes soapy to you, use chopped scallions instead.
How to Build Creamy Black Beans Without Turning Them to Paste
Softening the Onion and Garlic First
Heat the oil before the beans go in and cook the onion until it starts to soften at the edges. That step gives the oil a base layer of flavor, and it keeps the garlic from tasting raw in the finished dish. Add the garlic only after the onion has had a head start, because garlic burns fast and turns bitter in a hot pot.
Letting the Broth Reduce
Once the beans and broth are in, bring everything to a gentle simmer and leave it uncovered. You want steam escaping so the liquid concentrates and the beans absorb more flavor. If the pot boils hard, the beans can split open too aggressively and the broth can taste harsh instead of rounded.
Mashing for Texture, Not Smoothness
Use the back of a spoon or a potato masher to crush about a quarter of the beans against the side of the pot. That releases starch and thickens the liquid naturally, which is what gives restaurant beans their creamy body. If the pot still looks loose after a few minutes, mash a little more and let it simmer again before reaching for any extra thickener.
Finishing With Lime and Cilantro
Add the lime juice after the beans are off the heat or right at the end of cooking. Acid added too early can dull the cumin and make the beans taste less rounded. Stir in the cilantro last so it keeps its color and fresh flavor instead of fading into the background.
Three Ways to Make These Beans Work for Your Table
Vegetarian or Vegan Version
Use vegetable broth and olive oil exactly as written. You won’t lose anything in texture, and the beans still come out rich because the flavor is built from the onion, garlic, cumin, and the reduction in the pot.
Extra-Creamy Beans for Burrito Bowls
Mash closer to half the beans instead of a quarter, then simmer for a few extra minutes. The flavor stays the same, but the texture gets thicker and more spoonable, which is ideal when you want the beans to sit under rice and toppings without running.
Using Dried Beans Instead of Canned
Cook about 4 1/2 cups of dried black beans until fully tender before starting the recipe. Save some of the cooking liquid and use it in place of part of the broth for a deeper bean flavor. The result is excellent, but the timing stretches from a quick side to a longer project.
Low-Sodium Adjustment
Use low-sodium broth and reduce the added salt at the start, then finish by tasting at the end. Beans need salt to taste lively, but if you season too early with a salty broth, the liquid can reduce faster than you expect and the final dish lands too hard.
Storage and Reheating
- Refrigerator: Store in an airtight container for up to 4 days. The beans thicken as they sit, which is normal.
- Freezer: Freeze for up to 3 months in a sealed container or freezer bag. Thaw overnight in the refrigerator before reheating.
- Reheating: Warm gently on the stove over low heat with a splash of broth or water. The common mistake is cranking up the heat, which dries the beans out and makes the texture stiff before the center is warm.
Answers to the Questions Worth Asking
Restaurant Style Black Beans
Ingredients
Equipment
Method
- Heat olive oil in a large Dutch oven over medium heat. Add quartered onion and cook for 2 minutes, then add minced garlic and cook for 1 minute until fragrant, stirring so it doesn’t brown.
- Add drained black beans, bay leaves, cumin, black pepper, salt, and broth to the pot. Bring to a simmer and cook uncovered for 20 minutes, stirring occasionally, until the beans look glossy and flavorful.
- Mash about 1/4 of the beans against the side of the pot to create a creamy consistency while keeping some beans whole. Taste and adjust seasonings with lime juice, then remove bay leaves.
- Stir in chopped cilantro and keep the beans hot in the pot. Serve immediately so the cilantro garnish stays bright and visible.


