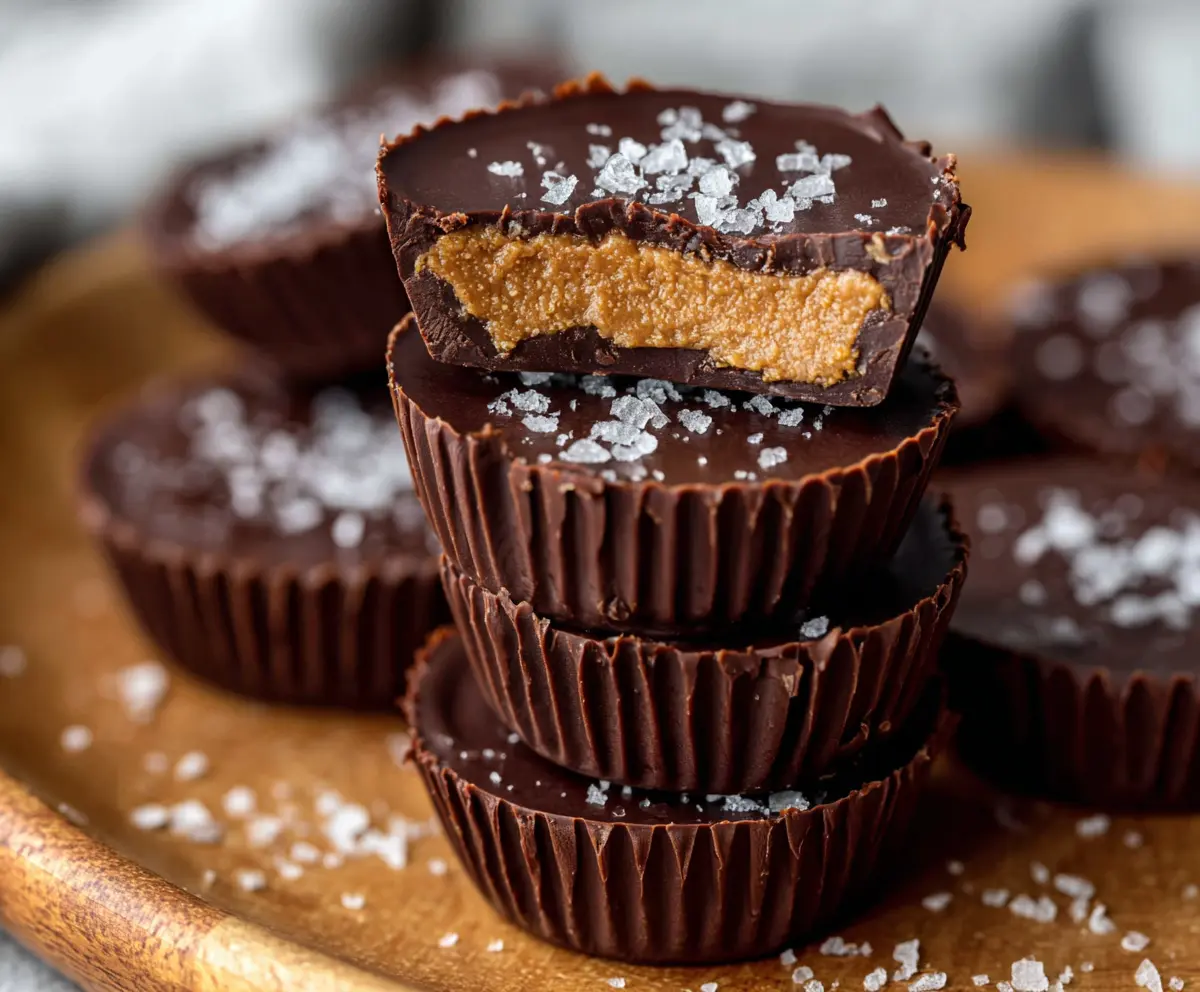
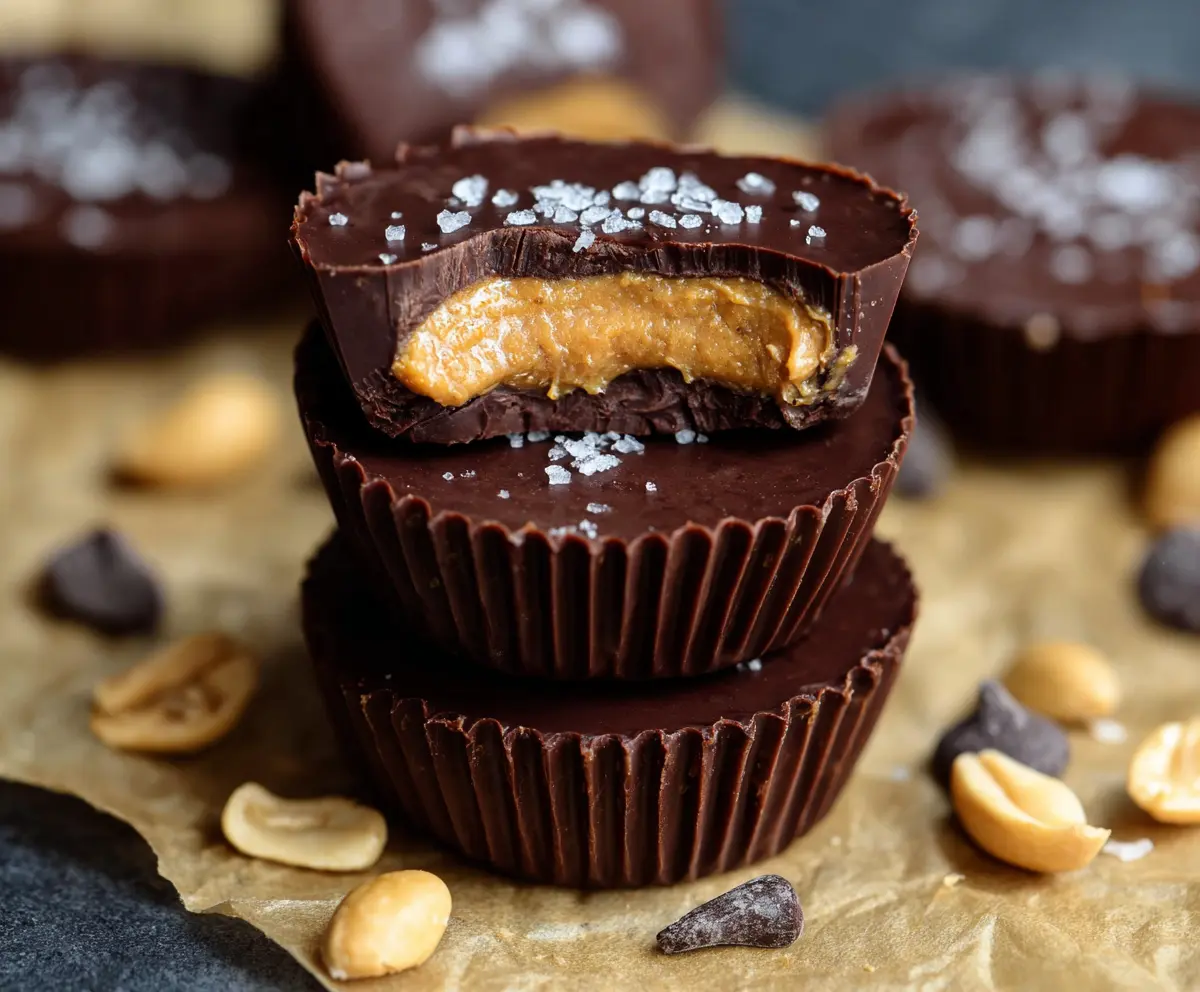
These Protein Peanut Butter Cups are a tasty treat packed with protein! They have a creamy peanut butter center wrapped in rich chocolate, making them perfect for a sweet snack.
Who can resist the combo of chocolate and peanut butter? I love keeping these on hand for a quick energy boost after a workout. They’re easy to make and oh-so-yummy!
Key Ingredients & Substitutions
Peanut Butter: Using natural peanut butter keeps these cups healthier. If you’re allergic or prefer a different nut, almond butter or sunbutter are great alternatives!
Protein Powder: I love vanilla protein powder for its flavor, but chocolate protein powder works too! If you want to skip the protein powder, you can use extra peanut butter, just adjust sweetness.
Coconut Flour: This helps absorb moisture and adds texture. If you don’t have it, you can use almond flour, but be careful with the amount since they have different absorption rates.
Maple Syrup or Honey: Both add sweetness. For a vegan option, stick with maple syrup. You can also use agave syrup for a milder taste.
Dark Chocolate: Aim for at least 70% cocoa for a rich flavor. If you’re not a fan, milk or white chocolate can be used, but they might add sugar and calories.
How Do I Melt Chocolate Smoothly?
Melted chocolate is key for these cups, but it can be tricky. Here’s how to do it right:
- Chop chocolate into small, even pieces for consistent melting.
- Microwave in a safe bowl in 30-second bursts. Stir between each session to break up lumps — this prevents burning.
- If you prefer a smoother texture, add coconut oil. It helps the chocolate glide perfectly over your peanut butter layer.
Now you’re set to make these delicious peanut butter cups with confidence! Enjoy your cooking!
How to Make Protein Peanut Butter Cups
Ingredients You’ll Need:
- 1 cup natural peanut butter (creamy or crunchy, unsweetened)
- 1/4 cup vanilla protein powder (whey or plant-based)
- 2 tablespoons coconut flour
- 2 tablespoons maple syrup or honey
- 1/4 teaspoon salt (plus more for topping)
- 1 cup dark chocolate chips or bars (70% cocoa or higher)
- 1 teaspoon coconut oil (optional, for smoother chocolate)
How Much Time Will You Need?
This recipe takes about 15 minutes of prep time, plus 30 minutes to chill in the freezer. In total, you’ll be enjoying your homemade protein peanut butter cups in less than an hour!
Step-by-Step Instructions:
1. Prepare the Muffin Tin:
Start by lining a 12-cup muffin tin with mini cupcake liners. This will make it easy to remove the peanut butter cups later on!
2. Make the Peanut Butter Mixture:
In a medium bowl, combine the natural peanut butter, protein powder, coconut flour, maple syrup or honey, and salt. Mix everything together until it forms a dough-like consistency. If it’s too sticky, sprinkle in a little more coconut flour until it feels just right!
3. Melt the Chocolate:
In a microwave-safe bowl, melt the dark chocolate chips and coconut oil (if using) together. Heat in 30-second intervals, stirring well in between until it’s smooth and creamy.
4. Create the Chocolate Base:
Pour about 1 teaspoon of the melted chocolate into the bottom of each cupcake liner. Use the back of a spoon to spread the chocolate evenly across the base.
5. Set the Base:
Place the muffin tin in the freezer for about 10 minutes to allow the chocolate to set. This will help keep the layers separate and prevent mixing!
6. Add the Peanut Butter Layer:
Once the chocolate has set, take the tin out of the freezer. Add about 1 tablespoon of the peanut butter protein mixture on top of the chocolate layer. Press it down slightly to form an even layer.
7. Top with More Chocolate:
Spoon another teaspoon of melted chocolate over the peanut butter layer to completely cover it. This creates that delicious chocolate shell!
8. Season with Sea Salt:
Sprinkle a pinch of flaky sea salt over the top of each peanut butter cup to enhance the flavor. It’s a small touch that makes a big difference!
9. Chill Until Firm:
Return the muffin tin to the freezer and chill for at least 30 minutes, or until the chocolate is completely firm.
10. Enjoy Your Treats:
Once set, carefully remove the protein peanut butter cups from the liners. Store them in an airtight container in the refrigerator or freezer, and enjoy whenever you need a delicious and nutritious snack!
These protein-packed peanut butter cups are perfect for a quick energy boost or a sweet treat that feels indulgent but is full of good ingredients. Happy snacking!
Can I Use Different Nut Butters?
Absolutely! If you prefer almond butter or sunflower seed butter, feel free to substitute them for peanut butter. Just make sure they are unsweetened and natural for the best flavor and texture.
How Should I Store Leftovers?
Store any leftover protein peanut butter cups in an airtight container in the refrigerator for up to a week, or freeze them for up to three months. If frozen, just let them thaw in the fridge before enjoying!
What if My Chocolate Doesn’t Melt Smoothly?
If your chocolate is clumpy or doesn’t melt well, try adding a teaspoon of coconut oil and continue heating in 10-second increments, stirring well in between. This helps create a silky smooth texture!
Can I Make These Cups Vegan?
Yes! Use a plant-based protein powder and substitute maple syrup for honey to make these peanut butter cups completely vegan. Just ensure your chocolate is dairy-free as well!