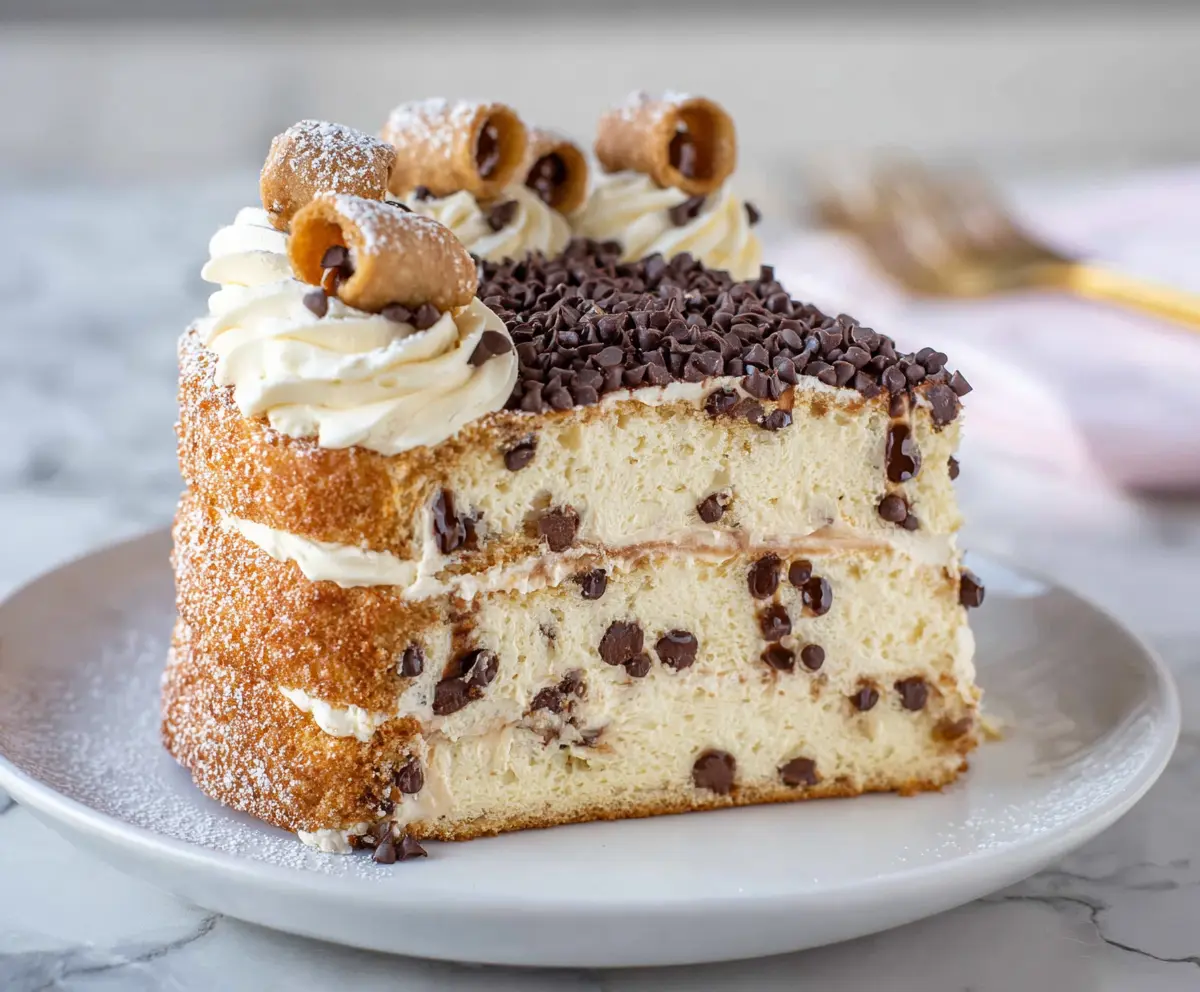
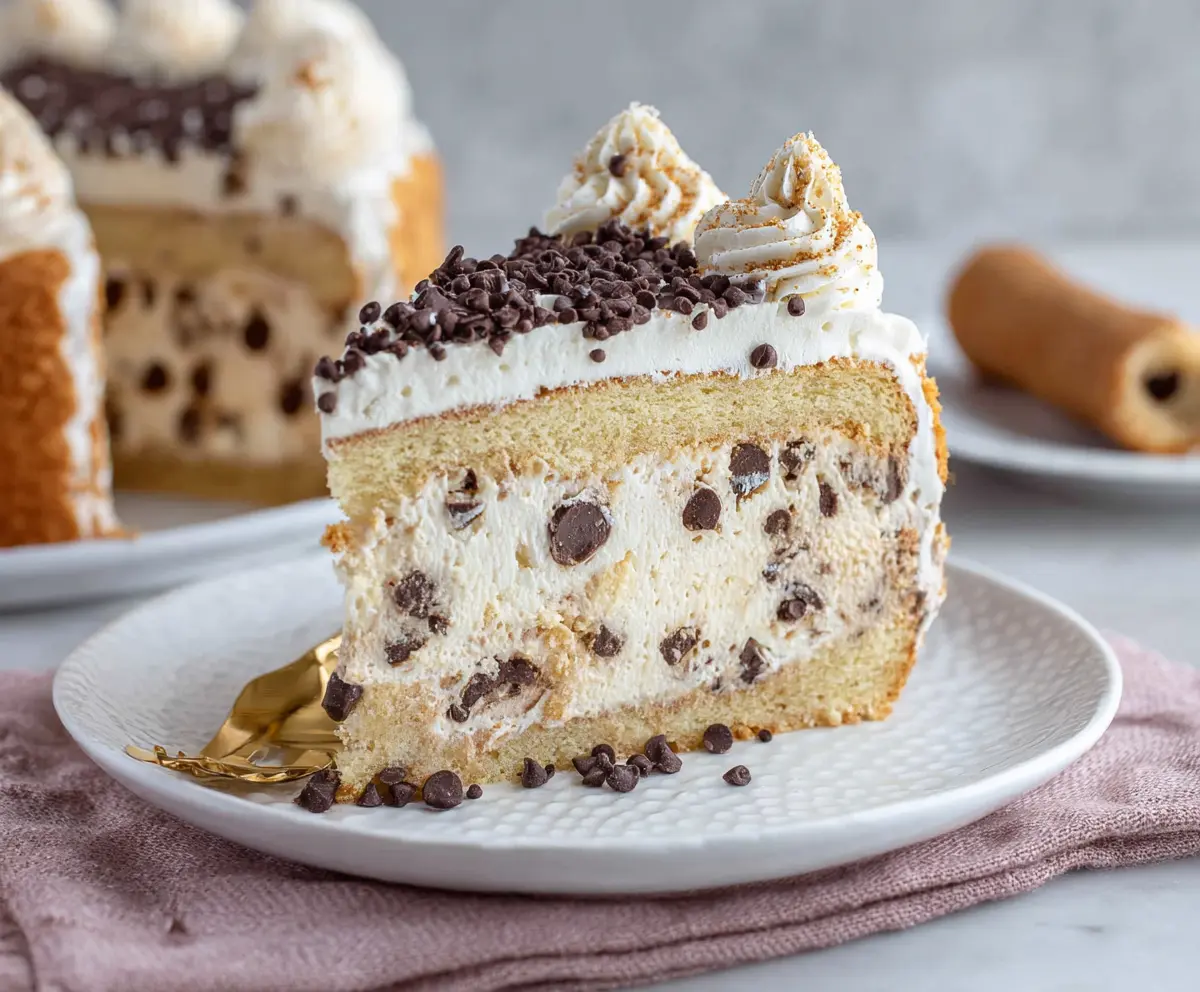
This Cannoli Cake brings the delicious taste of classic cannoli into a fluffy cake form. With creamy filling and a sprinkle of chocolate chips, it’s a treat for anyone!
Baking this cake is so fun! I love how the filling is the star, just like the cannoli it’s inspired by. Every bite feels like a little party in my mouth! 🎉
The best part is sharing it with friends. They always say it’s like a dessert and a party combined. It’s easy to impress them with this tasty treat!
Key Ingredients & Substitutions
All-Purpose Flour: This provides the structure for the cake. If you’re gluten-free, substitute with a 1:1 gluten-free flour blend. I’ve made it both ways, and it works well!
Ricotta Cheese: The star of our cannoli filling! If you want a lighter option, use part-skim ricotta. Drain it well to avoid a soggy cake – no one likes that!
Unsalted Butter: I always use unsalted to control the saltiness. If you’re out, you can replace it with equal parts of vegetable oil, though the flavor will be slightly different.
Heavy Whipping Cream: This is essential for a fluffy frosting! If you’re looking for a lighter version, you can use half-and-half, but it won’t be as fluffy.
How Do You Ensure Your Cake Layers Are Fluffy and Moist?
Getting light and moist cake layers can be tricky, but it’s all about following a few key steps:
- Make sure to cream your butter and sugar until it’s really fluffy—this incorporates air for a better rise.
- Don’t overmix when you combine wet and dry ingredients. Mix just until combined to keep your cake light.
- Let the cakes cool in the pan for a bit before transferring them to a rack. This prevents breaking while cooling.
What’s the Best Way to Create That Creamy Cannoli Filling?
The cannoli filling is what sets this cake apart! Here’s how to nail it:
- Drain your ricotta overnight in a sieve to get rid of excess moisture. This keeps your filling from becoming runny.
- When whipping the cream, make sure your bowl and beaters are cold—this helps achieve the perfect stiff peaks.
- Gently fold the whipped cream into the ricotta mix to keep that light and airy texture you want for the filling.
With these tips and insights, you’ll have an incredibly delicious Cannoli Cake that everyone will love! Enjoy bringing this dessert to life!
How to Make a Delicious Cannoli Cake
Ingredients You’ll Need:
For the Cake:
- 2 ½ cups all-purpose flour
- 1 Tbsp baking powder
- ¼ tsp salt
- ¾ cup unsalted butter, softened
- 1 cup granulated sugar
- 4 large eggs
- 1 tsp vanilla extract
- 1 cup whole milk
- ½ cup mini chocolate chips
For the Cannoli Cream Filling and Frosting:
- 16 oz ricotta cheese, drained overnight
- 1 ½ cups powdered sugar, divided
- 1 tsp vanilla extract
- 1 cup heavy whipping cream
- ½ cup mini chocolate chips
For Decoration:
- Mini cannoli shells
- Additional mini chocolate chips
- Powdered sugar for dusting
How Much Time Will You Need?
This Cannoli Cake requires about 30 minutes of prep time, plus 30 minutes of baking time. After assembling, it needs to chill in the refrigerator for at least 2 hours before serving. In total, you’ll spend around 3 hours before it’s ready to enjoy!
Step-by-Step Instructions:
1. Prepare the Cake Batter:
First, preheat your oven to 350°F (175°C). Grease and flour two 8-inch round cake pans to prevent sticking. In a medium bowl, whisk together the flour, baking powder, and salt so everything is mixed well. In a large bowl, cream the softened butter and granulated sugar together until it’s light and fluffy. Add the eggs one at a time, mixing well after each addition, and stir in the vanilla extract. Now, alternate adding the flour mixture and the milk to the butter mixture, beginning and ending with the flour. Be careful not to overmix—just combine until you don’t see any dry flour. Finally, gently fold in the mini chocolate chips for a sweet surprise in every bite!
2. Bake the Cake Layers:
Next, evenly divide the batter between the prepared pans and pop them in the oven. Bake for 25-30 minutes, or until a toothpick inserted into the center comes out clean. Once baked, let the cakes cool in the pans for about 10 minutes. After that, turn them out onto wire racks to cool completely—this prevents them from getting soggy.
3. Prepare the Cannoli Cream:
While your cakes are cooling, let’s make the cannoli filling! Make sure your ricotta cheese has been drained overnight to remove excess moisture. In a large bowl, blend the ricotta, 1 cup of powdered sugar, and vanilla extract until it’s smooth and creamy. Then, in another bowl, whip the heavy cream until soft peaks form. Gradually add the remaining ½ cup of powdered sugar and continue to whip until you get stiff peaks. Now, gently fold the whipped cream into the ricotta mixture until everything is combined, then stir in the mini chocolate chips.
4. Assemble the Cake:
Now for the assembly! Place one layer of cake on your serving plate and spread a thick layer of cannoli cream over it. Top it with the second layer of cake and spread the remaining cannoli cream evenly over the top and sides of the cake. It’s okay if it gets a little messy—that just adds to the fun!
5. Decorate:
Let’s make this cake beautiful! Press mini chocolate chips onto the top of the cake for a lovely touch. Pipe dollops of whipped cream around the edge of the top and place mini cannoli shells on those dollops—this gives it the classic cannoli look! To finish, lightly dust the entire cake with powdered sugar to add a little sweetness.
6. Chill and Serve:
Finally, pop your gorgeous cake in the refrigerator for at least 2 hours before serving. This chilling time allows all the flavors to meld together beautifully. Once it’s chilled, slice it up and enjoy your scrumptious Cannoli Cake! It’s a delightful twist on the classic treat!
Enjoy sharing this cake with friends or saving it all for yourself—either way, you’re in for a delicious treat!
Can I Use Different Types of Cheese for the Filling?
While ricotta is traditionally used for cannoli filling, you can experiment with mascarpone for a richer flavor or cream cheese for a tangy twist. Just make sure to drain any excess moisture if you use cream cheese to keep the filling creamy!
Can I Bake This Cake in Advance?
Absolutely! You can bake the cake layers a day or two in advance. Just wrap them well in plastic wrap and store them at room temperature. When you’re ready to assemble, let them cool completely before adding the filling.
How Should I Store Leftover Cannoli Cake?
Store any leftover cake in an airtight container in the refrigerator for up to three days. To keep the cake moist, cover the cut ends with plastic wrap. Just be gentle when cutting to preserve the filling!
Can I Freeze This Cake?
You can freeze the cake layers for up to three months! Just make sure they are completely cooled, wrap them tightly in plastic wrap, and then place them in a freezer bag. Thaw in the fridge overnight before assembling with the filling.


